Can I Take My Own Passport Photo?
A fundamental step in the passport application process is providing a suitable photo. But can this important task be a do-it-yourself endeavor?
This article will answer your question, “Can I take my own passport photo?” (spoiler—yes, you can!) and provide a comprehensive guide on how to take a good passport photo using the 7ID App.
Table of contents
- Passport Photo Requirements
- How to Take Your Own Passport Photo
- 7ID app: instantly edit your passport photo with a phone!
- Common Mistakes to Avoid
Passport Photo Requirements
A passport photo is used to identify you as the legal holder of your passport. It's an essential security feature and must meet certain standards to be considered acceptable. Some standard requirements include:
- An identification photo must be a clear, full-face view of the person, without any extraneous objects;
- The photo must accurately reflect the current appearance of the passport applicant.
- Typically, the photo should be taken no earlier than six months before the application is submitted.
- You must maintain a neutral facial expression when the photo is taken.
- You must look directly at the camera, which should be positioned at face level for optimal results.
- The face is well-defined and not obscured by hair or headwear in the photo.
Specific guidelines on dimensions, background, and composition:
- The dimensions required for a passport photo vary depending on each country's specific requirements. The most common sizes for passport photos include:
- 2×2 inches (required by the U.S. and India);
- 35×45 mm (adopted by the U.K., Europe, Australia, Singapore, Nigeria and several other countries);
- 5×7 cm (Canada);
- 33×48 mm (China).
- Sizes such as 3×4 cm, 4×4 cm, 4×5 cm, and 4×6 cm are also commonly used.
- A plain white or off-white background is required, and the subject should face the camera directly.
- Glasses, head coverings (except for religious reasons), uniforms, or camouflage should be avoided.
While there are universal standards for passport photos, some requirements may vary from country to country. For example, the UK requires a 35×45 mm photo, while Canada requires a larger 50×70 mm photo. Other countries, such as Indonesia, prefer a colored background to the standard white.
It's critical to check the specific requirements of your country or the agency processing your passport application. Many government or embassy websites provide detailed guidelines on passport photo requirements.
How to Take Your Own Passport Photo
With today's technology, there is no need to go to a professional photo studio to get a compliant passport photo. You can also take it yourself, at home, and you don't need a professional camera for that.
Want to know how to take a passport photo with an iPhone? Here is a step-by-step guide to taking a DIY passport photo:
- Gather the necessary equipment: A digital camera or a newer smartphone with a high-resolution camera and a tripod (if necessary) will help you capture clear images.
- Set up the right lighting and background: Avoid overhead lighting, which casts shadows. Instead, use soft, diffused light from the front. Ensure the background is plain with no textures, patterns, or objects. If you use a passport photo editor like 7ID, you can take a photo on any background; the app will remove it automatically.
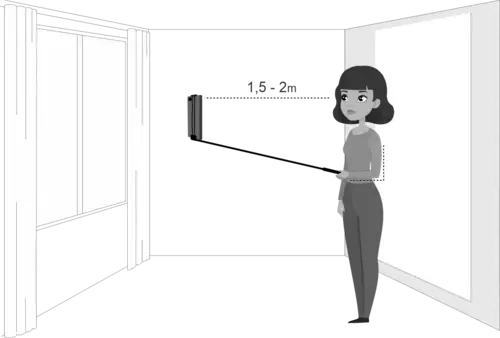
- Use an appropriate camera or smartphone: Hold the camera at eye level, about 4 feet (1.2 m) away from the subject. Use a timer to prevent the digital camera from shaking.
- Maintain proper facial expression and pose: Maintain a neutral facial expression, eyes open and facing the camera, with the shoulder square to the camera.
- Post-processing and editing tips: Try to avoid filters or drastic editing. All you may need to do is adjust the image to the proper size, and our special 7ID Photo app will do that for you!
7ID App: Instantly Edit Your Passport Photo with a Phone!
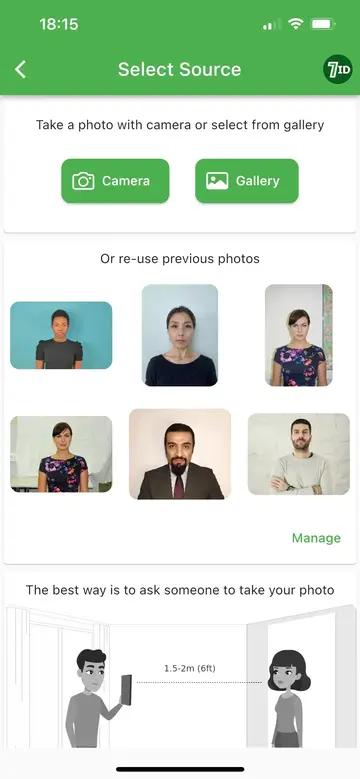
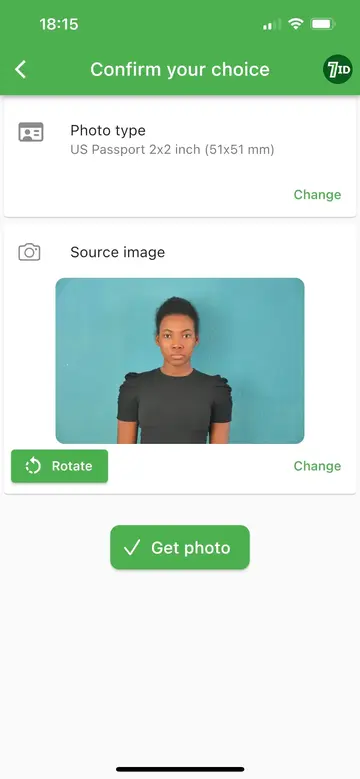
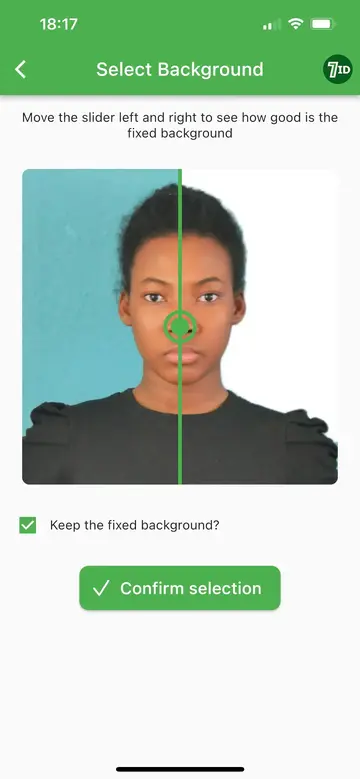
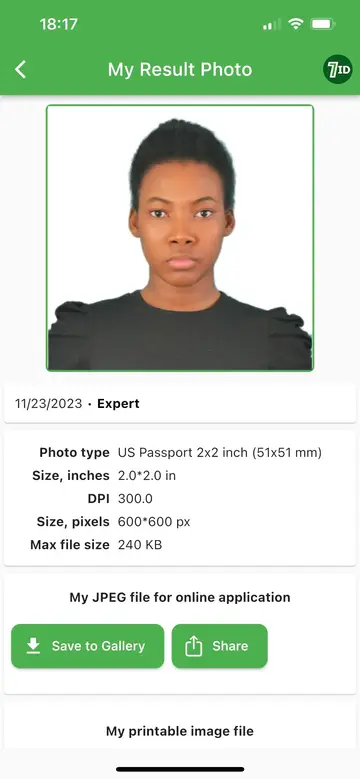
Introducing 7ID Photo Editor App — a handy tool to take passport photos using your iPhone or Android device. Whether you need a photo for online submission or a physical presentation, 7ID is fully equipped to meet your needs.
Simply upload your image to the application, specify the country and document, and take advantage of the sophisticated features offered:
Automatic photo resizing: No need to worry about how to take a 2×2 passport photo on an iPhone. With 7ID, your snapshot will be automatically cropped to any size and appropriate format, with the head and eyes accurately positioned.
Background color change: With the simple slider control, you can easily change the background of your photo to white or blue. The comprehensive 7ID Editor allows you to change the background of the passport snapshot to a uniform white, light gray, or blue, which meets the universally accepted criteria for legal documents.
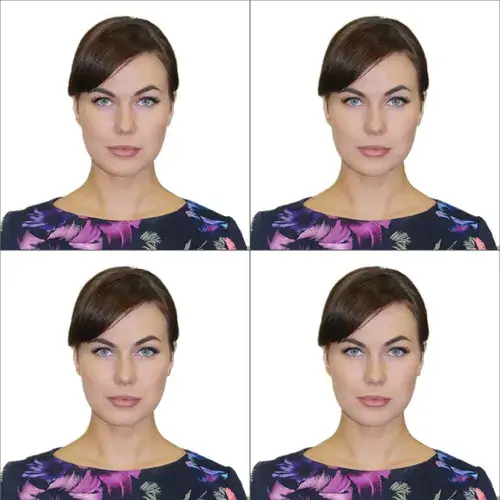
Printable template availability: Once your passport photo has been perfected, 7ID offers a printable layout adjusted to the correct dimensions. It allows you to fit the image to various standard paper sizes: 10×15 cm (4×6 inches), A4, A5, B5. You can print it on your home printer or visit a local copy center.
The app's user-friendly design and innovative features remove the worry and deliver a flawless photo that meets all requirements.
Take your own passport photo and print it at Walgreens. Simply do the following:
- Take a high-quality picture, upload it to the app, and get your edited photo template;
- Go to Walgreens photo services website;
- Choose a needed print;
- Upload your 7ID printed passport template (with 4 individual photos);
- Pay for your order and select the Walgreens store nearest you for print pickup.

Take your own passport photo and print at Walgreens
Common Mistakes to Avoid
A rejected passport photo can be a frustrating obstacle to your travel plans. That's why getting it right the first time is vital to avoid processing delays. Here are some of the most common mistakes that lead to passport photo rejections:
- Outdated photos: Passport photos must be recent, taken explicitly within the last six months. Outdated photos are one of the most common reasons for passport rejections.
- Incorrect size: The photo size must be within the required dimensions. For example, in the U.S., the standard passport photo size is 2 x 2 inches (51 x 51 mm).
- Shadows and lighting: A photo that is unclear or dark due to shadows or poor lighting is likely to be rejected. The photo should be clear, and the lighting should be even and balanced.
- Wrong background: Your photo must have a plain white or off-white background with no patterns or textures.
- Facial obstructions: The face should be clearly visible without anything covering the forehead, chin, or cheeks. Things like sunglasses, hats (except for religious reasons), and heavy makeup can lead to rejection.
Avoiding these common mistakes will increase your chances of getting your passport application approved. Here are a few helpful tips:
- Facial expression: Keep your face neutral, with both eyes open and looking directly at the camera. Avoid smiling or frowning.
- Shadows and background: Use soft, diffused lighting to avoid shadows on the face or background. The background should be plain with no texture or pattern.
- Clothing and accessories: While there are no hard and fast rules about what to wear, avoid uniforms, clothing that looks like a uniform, or clothing that blends in with the background. Remove eyeglasses to avoid glare or shadows. Unless worn daily for religious purposes, head coverings are not permitted.
Following these guidelines for clothing and accessories is essential. Your passport photo must resemble your everyday appearance to ensure accurate identification. The goal is a clear, straightforward representation of you.
In conclusion, the answer to your question, “can I take my own passport photo at home?” is definitely yes! Simplify this process even more with the 7ID App. It'll save you time, money, and the frustration of dealing with rejected applications. Remember, a good photo is a halfway ticket to your journey!
Read more:
How to Print a Passport Photo from Your Phone? (USA)
Read the article
What To Wear For A Passport Photo? Dress-code
Read the article